


Workflow Tips
I have worked with many photographers over the years and found that most of them are stuck in workflows that are not working for them. Instead, they’re wasting their time with software that is taking far too much time than necessary.
Many of us have created our own image workflows using software we think is a good idea (based upon what we’ve seen or heard, or based upon a guess!) that could be slower than necessary.
I recommend PhotoMechanic for everything relating to importing files to your hard drive and renaming. It’s the industry standard for many professional photographers.
Here is my recommended workflow that will save you precious time and energy:
- Download your files to your computer/hard drive
- Rename files MMDDYYNN### (NN = Your Initials) (### = Please include the 0’s in front. i.e. “001, 002”)
(i.e. on February 20th 2018 for Sara Wolfram: “022018SW0001-2000”) - Connect to our FTP Server and make a folder titled “MMDDYYNN” and copy onto server. (Login details here)
- Upload images by morning after event
- Send FTP Email at start of upload to: info@onelove-photo.com and sara@onelove-photo.com
- Verify upload was successful
If you opt to use Mac Finder to rename your files, follow these steps:
- Copy all of the files from both camera bodies into ONE folder
- Sort images in the LIST view as shown below:

Sort items: Choose View > Show View Options, click the Sort By pop-up menu, then choose the sort order, such as Date Modified or Name.
In List view, right-click on the option bar and add the “Date Created” column in Finder view settings.
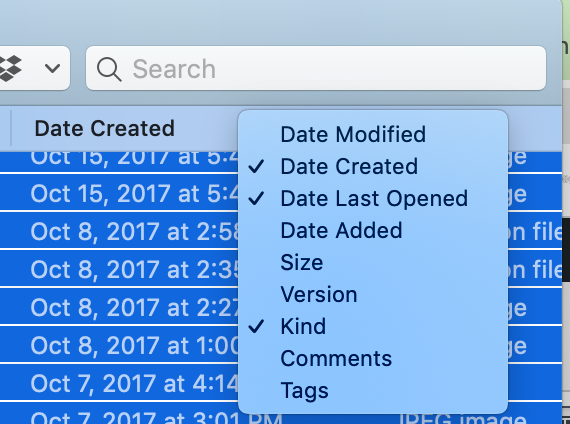
- Sort by Date Created
- Select all files and Choose File > Rename Items.
- Select: Name and Counter
- Add the date and your first two initials: MMDDYYNN### (NN = Your Initials) and start with the number one. The additional zeros are fine. (You want at least 3 zeros so this is plenty)
- Voila!
1. Download Cards to Hard Drive
- Insert memory cards into card reader (USB 3.0 connection recommended)
- Open PhotoMechanic>File>Ingest
- The “Ingest” function imports your RAW files into the folder you designate on your hard drive. It’s incredibly fast.
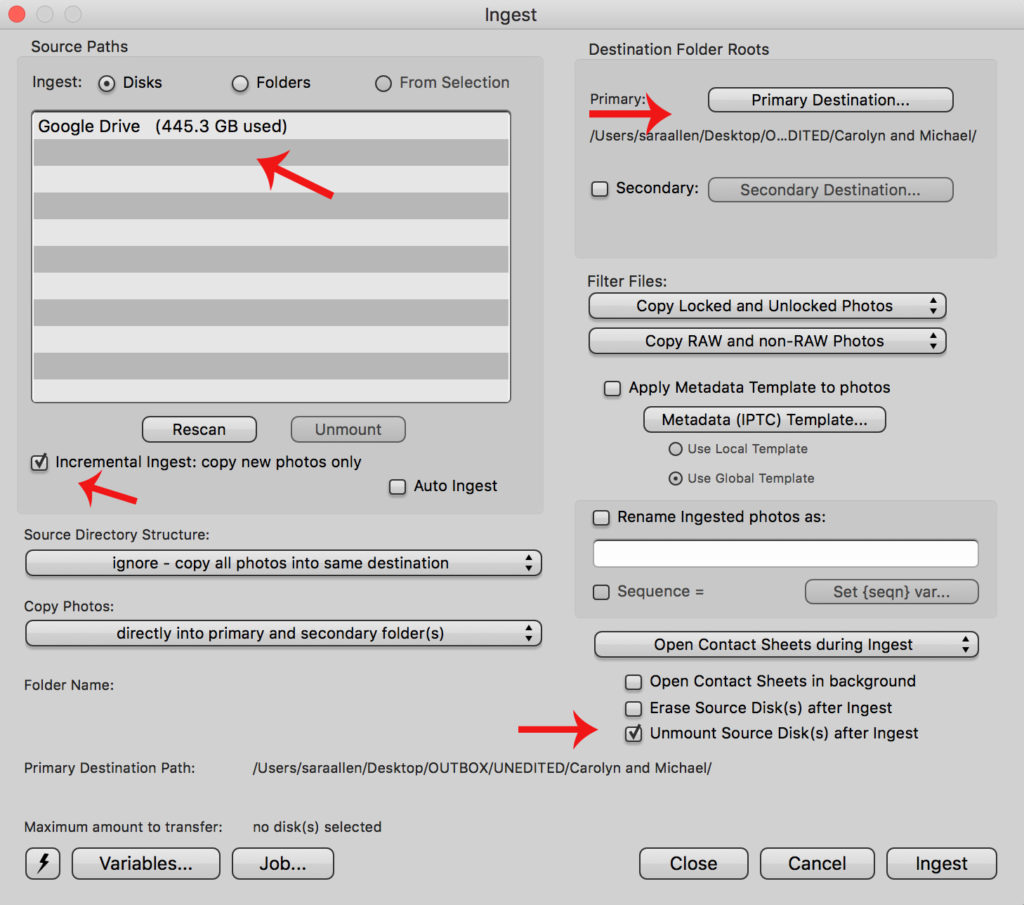
- Source Paths: Shows a list of the possible sources for the ingest, usually a camera card but could be any folder.
- Ingest Disks or Ingest Folders Radio Buttons: Use Ingest Disks when reading off a memory card reader. Select Ingest Folders to ingest from a particular Folder rather than a whole Volume.
- Incremental Ingest: Copy new photos only checkbox: Photo Mechanic will keep track of all photos previously downloaded and will only download photos that have not been downloaded before. If you reformat your card in your camera, then all photos shot since the format will be downloaded.
- Source Directory Structure – IGNORE: Ignores the folder structure and copies all image files into the same destination. This is good for copying all images off camera cards, regardless of how they are arranged on the card itself.
- Copy Photos: Directly into the folder specified as the Primary Destination (and Secondary Destination, if selected). This is my preference but if you prefer to name/date your folders that is also a fine choice.
- Primary Destination: Choose where the folders and/or images will be copied to by clicking the button and selecting a destination. Here you will make/select a folder you want to place the files on your hard drive.
- Unmount Source Disk after Ingest: This unmounts the card after it has finished ingesting so you can safely remove the card from the card reader. (I prefer this to erasing, that scares me!)
- I do not rename my files upon ingest, because I am importing multiple cards and they may not be imported in chronological order. I want to sort them by capture time after they are completely downloaded to my computer, and rename them at the next step.
2. Ingest Files
During Ingest an Ingest Tasks dialog appears showing the progress of the Ingest. Subsequent Ingests add a Ingest Task to the dialog so that you can keep track of multiple downloads.
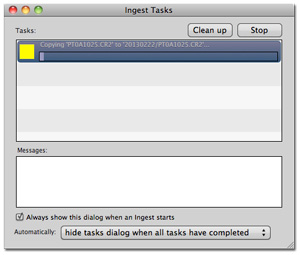
Thus if you have 5 cards to download, once there are 5 bars completed you will know that you have Ingested all 5 of the cards. Also, if you Ingest 5 cards simultaneously with multiple card readers you will be able to see the progress of all downloads at a glance.
Each Ingest Task is color coded. Green means that the Ingest completed with no errors. Red means that the Ingest completed with errors. Yellow means that the Ingest is in progress.
There is only one “Messages” area at the bottom of the window which is shared among all of the Ingest tasks. When you click on an Ingest Task, it will become selected and its messages will fill the “Messages” area.
Use the “Clean up” button to remove any completed tasks. Use the “Abort” button to stop the currently selected Ingest Task.
If you ever close the Ingest Tasks window and want to see it again, you can show it again from the Window menu.
3. Rename Files
Photo Mechanic provides a full renaming facility that is lightning fast. Long gone are the days of using Bridge or Lightroom to rename your files (too slooooooow!).
First:
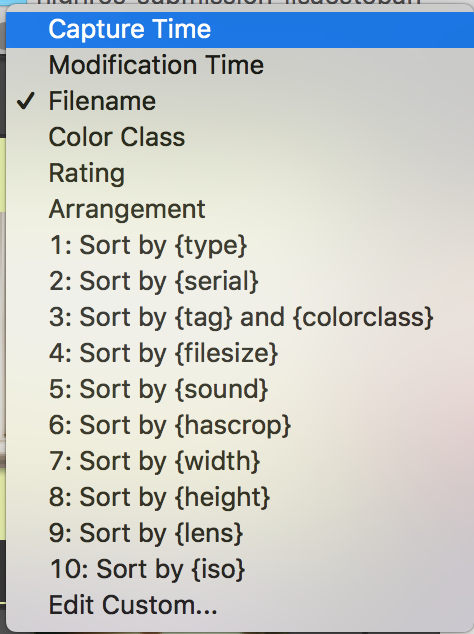
- Sort all images by Capture Time
Next:
- Select File>Rename Photos
In the screenshot below, files will be renamed as previewed under “6 photos to rename” and the current Sequence number is also shown. Renaming can be done on single images or any selection.

- Set {seqn} variable to 0001
- Click OK
- Rename. VOILA!
You’re ready to upload! You just saved priceless time with this faster workflow. Now go get your life!! <3
Back to The Goods
CATEGORIES:

